How to use Messenger’s Persistent Menu feature with your Messenger Chatbot
Do you know how to set up a Persistent Menu in Messenger for your Business Page? Keep Reading!

Messenger’s ‘Persistent Menu’ is a great way to help new users engage with your brand; helping them navigate through your chatbot and finding answers to their most common questions.
So, what is the Messenger persistent menu?
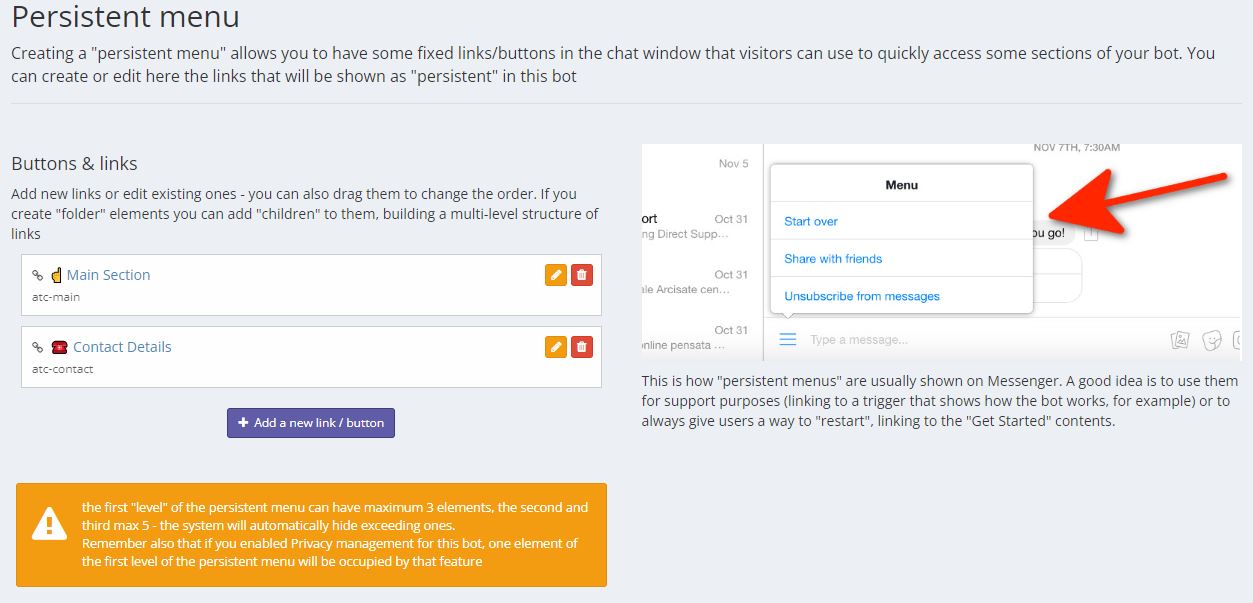
The persistent menu is a button in the bottom right-hand corner of the Messenger screen, near the type bar. It is the button which appears as three horizontal lines. When a user taps this button, they are presented with a ‘menu’ of options - this may vary from business to business but could include opening hours, how to book a reservation, and more.
According to Meta, “The persistent menu allows you to have an always-on user interface element inside Messenger conversations. This is an easy way to help people discover and access the core functionality of your Messenger bot at any point in the conversation.”
There are a few criteria you must meet to be able to add a persistent menu, according to Meta:
- The person must be running Messenger v106 or above on iOS or Android.
- The Facebook Page the Messenger bot is subscribe to must be published.
- The Messenger bot must be set to "public" in the app settings.
- The Messenger bot must have the pages_messaging permission.
- The Messenger bot must have a get started button set.
Thankfully, with the Chatbot Agency platform this couldn’t be easier - and we meet all the criteria for the Messenger bot. You can use any of our templates and customise them for your business. Now we know the core reason for having a persistent menu is for customer navigation - so let’s get set up!
Choosing your 3 Persistent Menu buttons
Meta allows you to add up to 3 buttons in a Persistent Menu. For this reason, it’s important to think carefully about what the most likely or helpful actions would be for your users.
There are a few commonly used buttons, based on both our and industry research:
- Certain specific buttons can be useful for your businesses specific Messenger goals. For example, a ‘Find your product/service’ button, if you want to encourage users to learn more about your offerings. This could prompt them into a quick quiz led by your chatbot. Users can be made to feel like they are getting a real, personalised and special experience rather than a one-fits-all recommendation.
- Restart — This allows users to repeat their actions or choose other options they need. Essentially, they can go back to the start of the adventure! They may have interacted with the bot previously; and the bot will remember this interaction. In order to ‘re-engage’ from the beginning, having a re-start button can be helpful! This will allow users to choose different buttons and engage differently with all options again.
- Stop — This gives users the ability to end the conversation on their terms without being badgered by follow-ups from your chatbot. Chatbots are becoming more popular than text and email as it is quick, easy communication and feels more human and less sales-y. We don’t want to ruin this by annoying our users when they are already satisfied.
The persistent menu title is limited to 30 characters, including spaces. You can add emojis or leave the buttons with text only. Emojis tend to have a higher conversion rate due to their friendliness, understandability and noticeability!
How to set up a Messenger persistent menu to work with your Chatbot Agency chatbot
Now you’ve decided what to call your Persistent Menu, and which buttons to add that will help your specific business goals.
It’s time to jump over to the Chatbot Agency platform and set it up with our Messenger Chatbot!
1. Login to Chatbot Agency, and head to Messenger Chatbots.
2. Select the Messenger Chatbot you wish to set the Persistent Menu for.
3. Under Manage This Chatbot, you will see a section for This bot triggers/replies. Under there, select the button Other Options.


4. Select Persistent Menu from the Other Options drop-down menu.
5. Again, you can create up to 3 buttons in your Persistent Menu. In this case, you can see we have already created 2 buttons in our Persistent Menu, Main Section and Contact Details. We will show you how to build a 3rd button to Chat With A Real Person, for this example.
6. Press Add a new link/button, and you will be taken to this pop-up:
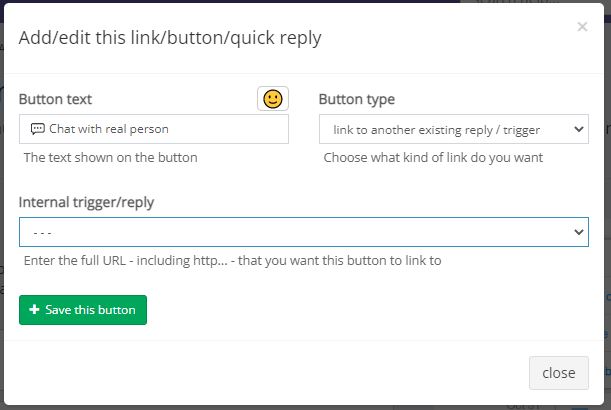
7. Choose your Button Type (this allows you to link to another existing reply or trigger). From the drop-down Internal Trigger/Reply section, you can enter your company's Live Chat URL.
8. Save your button, and now it has been added to your Persistent Menu!
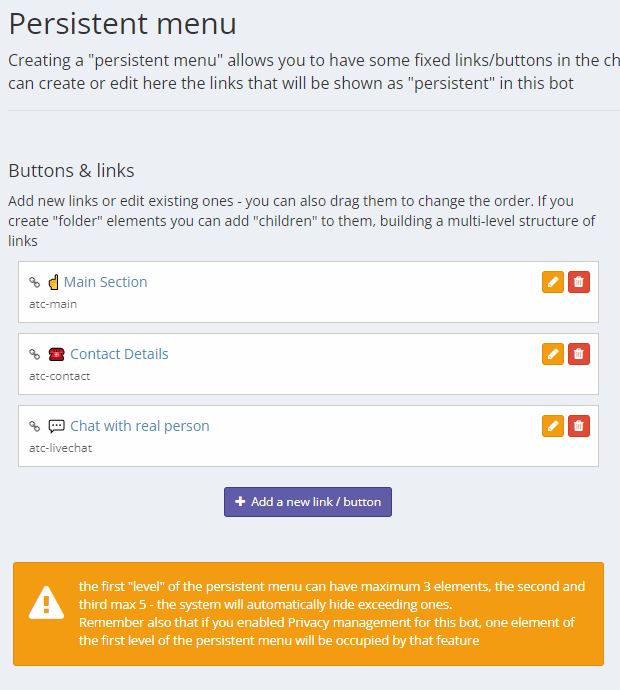
9. Now, head to test your Messenger Persistent Menu and make sure it is working and live! As you can see, we now have a third button showing in our Persistent Menu for our Live Chat option!
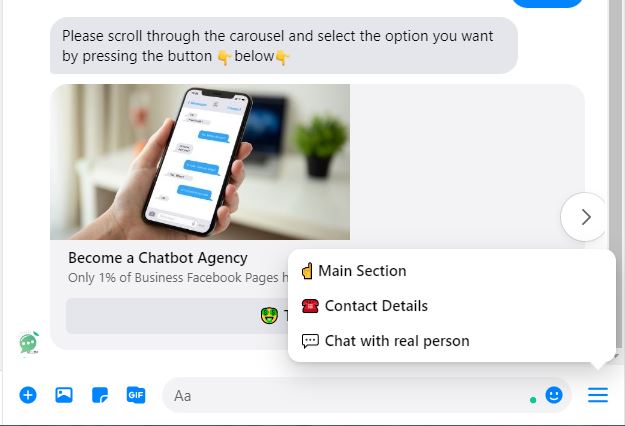
Voila! You have a Persistent Menu working hand-in-hand with your Messenger Chatbot
Woohoo! We did it! You have now successfully set up a Persistent Menu within your businesses Messenger chatbot. Make sure to test it out and double-check everything is correctly working.
Remember, you can update or change your Persistent Menu at any time - make use of it for special deals, upcoming events, competitions, and more!
Do you need some help getting your Persistent Menu set up on the Chatbot Agency platform? Get in touch today and let us help you!
Book a call here!